Tuesday 20 September 2011

Mugo Pine from Koirin Azalea Centre.

On Friday I popped in to Koirin azalea Center. Its just up the road from my golf club, Crane Valley Golf Club in Verwood. I've been meaning to go in and have a look around to see what there stock is like since I took an intrest in bonsai and learned that you don't need to grow from seed. I knew they sold other material other than azaleas in the nursery so was keen to see if there was any material that has potential for bonsai. I spoke to the owner and explained that I was looking for bonsai material and to my surprise the guy used to be a very keen bonsai enthusiast him self and used to be a member of the Wessex Bonsai Society of which I am now a member of. This was great to hear because he could then point me in the right direction regarding bonsai material. He took me to a potting area in the yard where there were ten or so azaleas that he explained had been mistakenly left to grow without cutting back. He told me that these shrubs make better bonsai because, although they look shabby they have long leader branches which help thicken up the trunks. I had a rummage through them looking only at the trunks as the branches can be grown later on. I chose one that I thought could possibly with time make a good bonsai but only time will tell. 

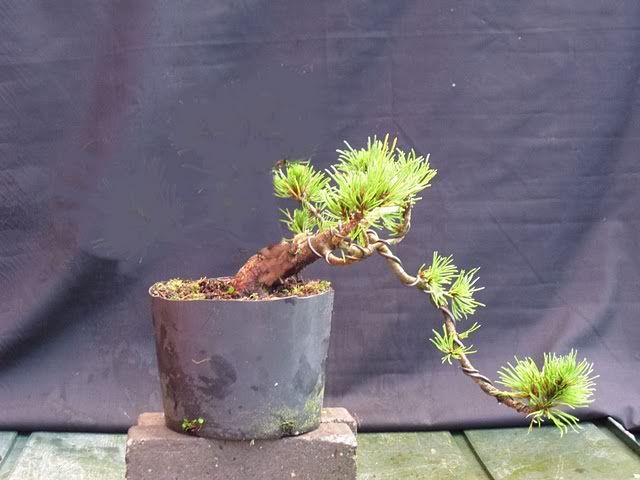
The Mugo Pine as I bought it for just £6.95
I went for a wonder around to see what else other than azaleas were for sale and came across some large Mugo pines. I looked through them but because of there size and the nature of mugo pines there was to many long branched with not much folage on them. I've seen many mugo pines in nurseries and garden centers and always dismissed them because they always have this long leggy experience. The owner of Koirin Azalea Center saw me looking through them and said "I thought you might take an intrest in them. There are some smaller but better for bonsai ones over there", and pointed to one of the beds. They were much better with some good amounts of foliage on them. And I couldn't believe they were only £6.95! Funnily the one closest to the front was the I thought I could do something with so here it is as it was when I bought it.

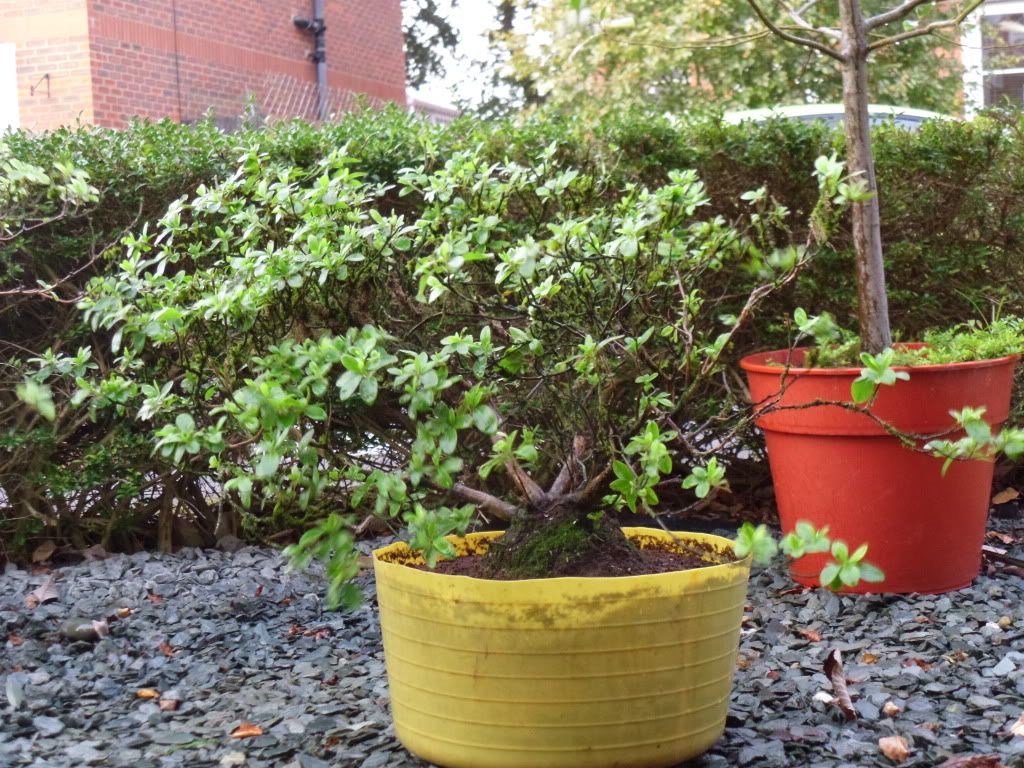
When I got them home I decided the azaler just needed potting in a larger garden pot and feed up until its health was better after being in the under sized pot for to long.

I checked with the guys over at weetrees and they said that pruning pines in September is fine because by now any new growth will of reached this years potential. Now I know many people regard cascades a lazy style as lots of material we use for bonsai are low growing and have a spreading tendency which suits cascades naturaly. But I had a look through it and from the curve in the main trunk decided a cascade or semi cascade was the only way I could really go with this pine.

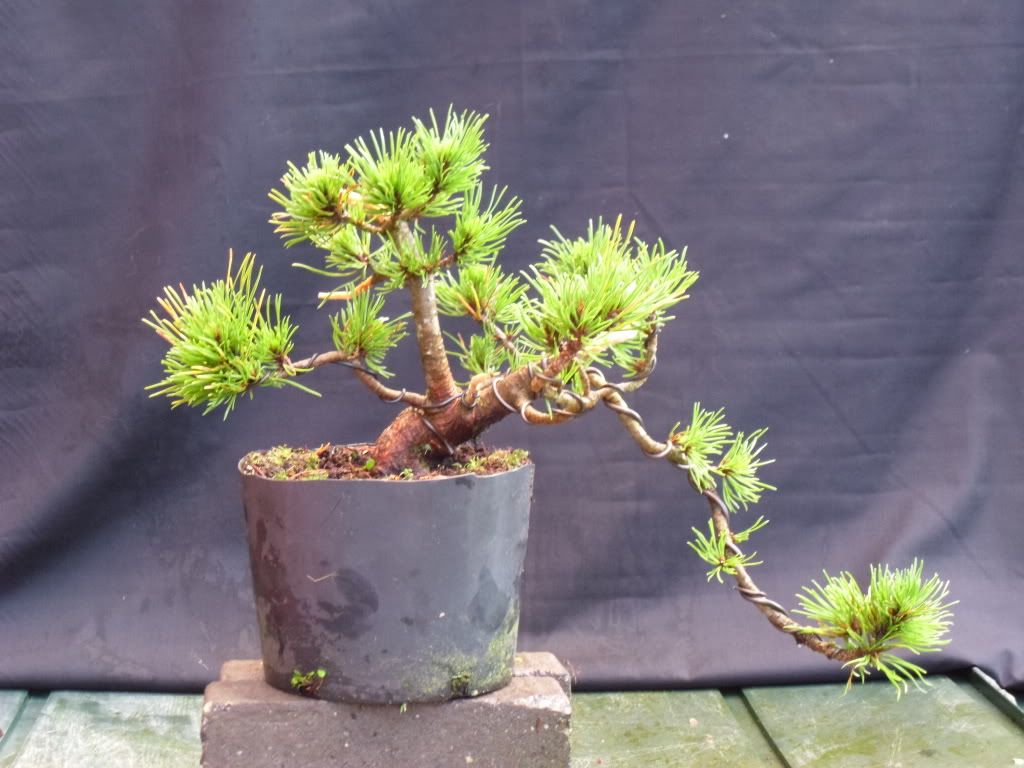
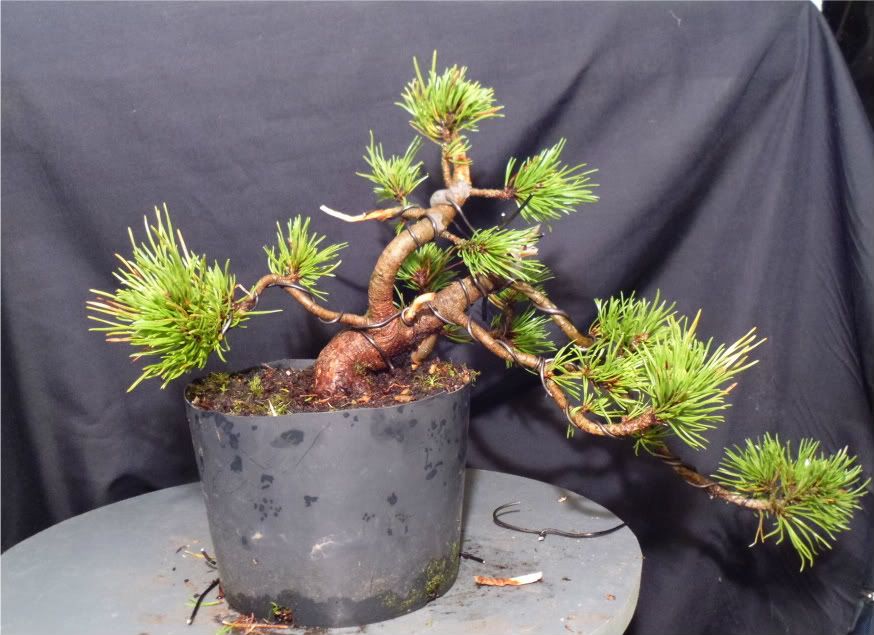
Initial styling of Mugo Pine 17/09/2011
The first thing I did was to cut the top from the pot so I could see the bottom of the trunk and get to the whole tree. It was pretty apparent which branch I would use as the main trailing trunk. One branch had a lot more folage points at intervals of about two inches apart. I then decided to cut out anything that definitely fit in with the image. This left me with just a few branches and made it a lot easier to create a pitcher of what I wanted the tree to look like in my mind. The image I was thinking of obviously was older and more mature than the tree before me but I believe its best to aspire to an end goal rather than a start point. This way your always working towards the same goal rather than changing it every time you work on a tree. I then cut out anything that didn't fit in with the picture in my head and wired the remaining branches. Then worked some movement in to the tree until I got what I, at the time believed to be as far as I could go with it for now.

MKonig's Vert
I posted the photo above in a thread on weetrees to show the members what I had done and ask for any critisam so I could improve on it. A couple of people commented on the tall, striaght upright trunk with two nodes with multiple branches on it looked wrong and I should definitely reduce the branches at the same point down to at least two. I agreed with the advise and had already wondered about it myself but didn't know what I could do about it. One member MKonig suggested cutting off all the back and turning it in to a full cascade like in the vert he did for me shown to the right. I agreed this does look a much better bonsai image but when I went back out side to do the appropriate cutting it became apparent to me that this would not be as realistically viable because the small branches that I had wired up to the sides of the main trailing trunk. It would look great from the side but be very 2 dimensional. Mike could not see this because he only had the photo I had given him to work with.


Mugo Pine as of 18/09/2011

The next day I went out and had another look. I decided because it was mainly the straightness of the top trunk that was a problem if I could get movement in to it I would be left with a better looking tree. Luckily, being a mugo pine that are much more flexible than other pines I was able to get quite a bit of movement in to the trunk. After removing a couple of small unnecessary branches I think this really is all I can do with the tree for now. I was advised to leave it well alone for a year or even two to let it regain strength after such traumatic surgery. I shall feed it up now until October with Tomartorite to hopefully give it the strength it needs to prepare for winter.

I hope you enjoyed reading this and if you wish to leave a comment please do so I'm glad to hear any criticism and and advise you may have.

Dean.


Sunday 18 September 2011

Keep you eye's peeled. You never know what you might find.

Since I started taking an intrest in bonsai I've developed a habit of looking at potential material every where. Bazarly even in places where I have no chance of collecting it. For instance I will walk around public parks and see a tree with great movement in the base of the trunk and stop to eye it up and work out in my head what options there are there for bonsai. I guess its just my way of training my imagination.

Well on Friday I was working at a huge farm house, one of my regular customers and walking past the compost heap I noticed what looked like three azaleas sitting on top of a pile of grass cuttings. I went in for a close look to find I was right. Three rather large azaleas. One was unfortunately dead but two , although looking a bit of a mess were alive and have shot out new shoots close to the base and on the trunks them self. I found them as you can see in the pictures, just sat in the soil they were dug up with. 
they were on the compost heap along with grass cuttings, pond weed and heaven knows what else. I could clearly see that what ever the reason they were there for they were not very loved and no body had any intentions of doing any thing with them other than letting them die like the third one. When I had finished the windows I went around to the house and asked Mrs Ward if I she had plan's for them and if not could I take them off her hands. She was more than happy for me to take them on but said she couldn't understand what I would want with such old bushes. "We have had them for years Dean. I mean years and years, since the children were young. We dug them up to make room in the spring and they have been there since I doubt there alive". I explained to her that two of them are alive and kicking and that I grow bonsai trees and I would cut them back so that over the following years could hopefully give them a new lease in life. She gave me a smile that said 'good luck with that!' and repeated that I was welcome to them. Luckily I had a couple of rhino tubs in the back of the van for work so popped them in them. Once I got them home I took some photos before I did anything to them. So the photos you see are exactly how the trees looked sat on the compost heap. 
The smaller twin trunk.
Largest of the two.
Once I sat them on the table I could get a better look at them and could see what I had to work with. I found that the trees were covered in pond weed that had wrapped its self around the branches. I think this pond weed may of been a contributing factor that kept them alive.

Before I started working on the tree I asked for advise on the bonsai forum I use weetrees.co.uk Where I was told the best course of action is to clean them up and get them in large pots to help growth. I was told its best not to rush them in to bonsai pots. at least not until there is sufficient new growth closer to where I want it, half way down from where it currently is.


Pond weed on the larger azalea
I got started on Saturday by clearing of the weeds and as much of the pond weed as I could without knocking off any buds or foliage. The smaller azalea was not so bad but the larger one was really thick with it. This is the reason for me thinking the pond weed had helped keep them alive. The larger one is easily the healthiest looking of the two with the leafs being a healthy dark green. There was a little sign of the tree layering its self. By that I mean it had sent out roots to feed on the moist weed but I don't think enough sign to make me think this is the only way the foliage has remained.


I had an old washing up bowl in the shed that suited the smaller azalea for size so drilled some holes in the bottom and potted it with a mix of ericaceous compost, organic soil and horticultural grit. The larger azalea got potted in one of the rhino tubs that I brought it home in. I just cut the top off so it didn't end up in a huge immovable tub. There is no reason to try and bulk up the trunks on these trees so they I don't think planting them in huge tubs will be justified. They both now have double the amount of soil they were in originally in and also better suited soil as its mostly ericaceous.

Smaller azalea in temporary tub


Its hard at this stage to get a good enough photo of the trees as there still shrubs and to large for any good detailed photos. Ideally I would put a black screen behind so your eyes are not distracted by all the back ground. But hopefully you can see, especially from the close up of the twin trunk and what has turned out to be great nabari on the smallest azalea that this will make a good bonsai if it makes it through the winter to get some good growing in the spring and summer. You can't really tell from the photo but it had a bad scar on the left trunk that has created reverse taper. This for those who aren't aware is where the trunk (or a branch) gets thicker as it goes up rather than the desired, thicker at the bottom becoming thinner the higher it gets.


The larger of the two I'm not really sure about now I have managed to clean it out. Mainly because the multi trunks are all leaning quite a bit and I am not sure if I can see much potential there. I will look after it and get it back budding and hopefully when I get the chance to take it up to the Bonsai club one of the guys can help advise me as to where to go with it.

I would upload some photos to weetrees and for ideas from the more experienced bonsai enthusiasts that use the forum but I really don't think any one could get a good enough view from a photo. This really is one of those trees that you need to get up close to and view all around to see any potential.

I will keep you informed as to how these two are getting on later in the year. I hope you enjoyed reading and please feel free to comment especially with any advice you may have. I am always glad to have any
 
Dean. 


Wednesday 14 September 2011

Club Night 13th September 2011

Tonight was club night at Wessex Bonsai Society and a really good one at that. The speakers for the evening were our very own members Italo and Manuel. The lecture was on 'Tanuki'.

The word tanuki stems from the Japanese raccoon dog which is said to have the ability to change its shape and there for is regarded as a trickster and a fraud. Tanuki can also be referred to in the west as Phoenix grafts. The reason they have this Japanese name that means fraud is because in Japan they are regarded as a fake bonsai tree and the Japanese do not allow tanuki to be entered in to bonsai competitions.

Now I don't personally fully agree with the term fake because the all the foliage whether it be leaf or needle is grown and developed in the normal way there for a tanuki bonsai tree is still a bonsai tree. It's just the element of the tree that is not growing that is added to trick the viewer in to thinking the tree is older than it really is. Now please correct me if I am wrong but is bonsai not all about tricking the individual that is viewing the tree in to believing it is something it is not anyway? For example when an azalea is grown to resemble a fully grown tree that has been miniaturised? I can understand the Japanese ruling out tanuki bonsai trees being entered in to competitions but I think there missing out by not having maybe a tanuki category.

Italo and Manuel brought along some amazing examples of tanuki bonsai trees one of which they had began development on 40 years ago! Manuel also brought along a couple of Chinese junipers that had not had dead wood added to them but were in fact what the Japanese would regard as 'real' junipers. The difference can be seen but for a pure instant visual impact the tanuki bonsai tree would rate a lot higher than the original juniper. You be the judge, which is real and which tanuki?


The answer is.... Both of them. The tree on your left is the one the guys started over 40 years old and the tree to the right has two live trunks running up the bleached white dead Juniper that did not make the import to the UK. Although neither of these trees are 100% grown trees I'm sure you agree they are very impressive never the less.

Italo and Manuel with there usual Mediterranean flare worked together to explain and demonstrate on two very large pieces of dead wood, how using some wedges to hold the dead wood out of the soil to prevent it rotting, wires to secure the dead wood to the pot much like you would a tree, brass eyelets as anchor points for the wires, some brass screws to hold the living tree to the dead wood and a whopping bucket of full of imagination  a tree that is only a few years old can be made to look like it has been around a lot longer that you and I.

Here are a couple of photos of  Italo and Manuel working together on the trees. I could see from the demonstration that creating a tanuki bonsai is most definitely a two man operation as you need to hold alot in to place. Even with the use of clamps, cable ties and two pairs of hands the job was an awkward and very fiddly one.


I asked the question "which is the most important ingredient when creating a tanuki and which would they advise I got right first, Good growing material or good dead wood material?" Both guys replied without a doubt the dead wood is the vital part. You can grow the tree in and around the dead wood to create the image you desire so its important to get the dead wood right first. 

You can see from the two trees below that started off at 7:30 as two very large pieces of dead wood and some Chinese Juniper whips now with very minimal styling because of limited time look like established old and very large bonsai that would sit well on most bonsai collectors benches and could in time be entered in a show and hold there own.


I have already managed to get my hands on a lovely piece of dead wood that I believe to be wisteria. I found it on my travels and thought it ideal for a tanuki with a juniperus squamata I have that has very limited potential because of its long sparse trunks and branch structure. But after watching Italo and Manuel with there Chinese junipers I've decided to keep the dead wood I have until I can get my hands on some Chinese juniper that will suit. In the mean time I shall keep my eyes peeled for another piece to marry up with the juniperus squamata as a practice run.


Saturday 10 September 2011

The Bonsai Tree that hooked me.

After speaking to a few bonsai enthusisats I have found that almost every one has a tree thast is special to them for a particuler reason. For some its there first tree and others its one they have made a beauty of from what looked like nothing. With me the tree that hooked me is the first bonsai tree I owned and the one that got me in to bonsai.

I got in to bonsai after one of my customers gave me a badly neglected 30 year old seed grown Scotts pine. I have always had an admiration for bonsai trees but never took an active intrest in them until I mentioned to Mr Dart that the small pine he had resting up against his green house looked like it had seen better days. He told me it was his late wife who had grown it from seed and he, despite being a very keen gardener had never really put much thought in to the poor little fella. It wasn't even in a pot and was living in a plastic drip tray. Mr Dart said if I thought I could do anything with it I was welcome to take it on and give it a second chance.

Not being one to pass up on a challenge I took him up on his offer and took the tree home. So there the tree was in my garden through the coldest winter for years and I had not a clue what to do with it. I got a book out from the local library but I really didn't have the guts to take to the tree with any secateurs. I realised I needed some help! Luckily I have customer who is in to bonsai and has a lovely garden with some great trees in it that I have admired since I started cleaning her windows. I spoke to Mrs Scannell about the Scotts pine and she suggested I took it along to the bonsai club of which she is a member. Its the Wessex bonsai society who meets every month on the second Tuesday and then twelve days later on the Sunday for a workshop. I went along to the following Tuesday evening to find it was the only Tuesday through the year that is a workshop evening. Result! I took along the tree and no sooner had I walked through the door than a number of people had members had come over the table where I had settled. Mrs Scannell was there and she let people know I needed help in styling the sorry looking leggy tree I had on the table in front of me.

A chap who I was informed named Itilo started chopping away at the tree. Some of the members were gasping as he lopped off branches. I was amazed to see the tree going through the transformation as he wrapped lengths of brown wire all at diffrent lengths around the branches and then bend them in to shape. All the time other members were coming over and introducing themselves. Within an hour Itilo had finished the styling of my first bonsai tree and I felt like I had been made very welcome to club. I decided there and then that this would not be the last time I made an appearance at the Wessex Bonsai Society.

I was told to feed a small amount, half measure of grow more for a while until the tree was strong enough for potting. Itilo told me the tree will hopefully back bud to bring foliage further back up the long leggy branches and closer to the trunk. "This is the desired look" I was informed. He also said to give it a good 6 weeks after the shock the tree had gone through with the pruning.

When the 6 weeks were up I went along to Sunday workshop where I was helped by Manuel, another member at the Wessex Bonsai Society, to pot the Scots pine. Mrs Scannell informed me the best place to get a pot that wouldnt break the bank was from a member called Mo who makes them at her home. Mo and her husband David were kind enough to let me go to there home and chose a pot the Friday before the Sunday workshop so I could pot it there with the help from Manuel. But it turned out the pot was to shallow for a pine and not suitable. Luckily a really great guy named Tim who said hello on my first night at the club and had seen the tree when it got its initial styling had a great Japanese pot that he thought would suit it great. He had brought it along that Sunday with half a dozen of his old tools including branch cutters and knob cutters on the off chance I would be there. Tim said to me he remembered when he first started out in bonsai and other older members helped him out by handing down some old bits and bobs that they no longer needed having upgraded to better quality tools. He wanted to do the same. I am sure you will agree Tim is one in a million, I genuinely nice guy.

Manuel helped me make a soil mix he swears by of 5 parts horticultural grit, 2 parts John Innis number two, 1 part ericaceous compost and 1 part multi purpose compost. He put 3 parts grit in first then the soils and finished with the remaining 2 parts grit mixing all the way. Manuel said to do it in this order to help the grit mix in well with the soils and not end up with all the grit at the bottom.

I should of asked what to do with the tree in regards to maintenance because I when I got to tree home and started a fortnightly feeding program the tree really started to come to life and began shooting out these long shoots from the tips of the branches. Thinking these were undesired and having a misconception that bonsai was all about clipping back the new growth of a bonsai tree I cut them off. I have since found out that with this variety of pine it is best to leave these, what I now know to be called 'candles' to fully grow and then cut them back to the length of the shortest candle (end of June) to promote the tree to throw out new buds. Some of these new buds will hopefully be further up the branches as Itilo mentioned. I made a few mistakes in the first growing season but the tree looks to be in good health and hopefully next year I will be able to do it at the right time. I did get some back buds to which I cut the branches back to. I've been told I should of left them to start to candle next year like the tips of the others did and then cut them back but it don't look to have harmed the tree so I think I got away with that one.

It looks a bit diffrent now as I have had to remove the wire in July because it was cutting in quite bad in places. I was advised to take the wire off and let it rest for a bit until the autumn so have done just that.

Friday 9 September 2011

An introduction the blogger himself.

To blog or not to blog, That has been the question on my mind for a few weeks now. As a regular member of the bonsai forum namely 'weetrees', I am often made aware of other members personal blogs in there signatures and through links to interesting and informative articles and photo diaries. I have been pondering whether I should have a go at one my self. But was unsure if I would have any thing to say of any intrest to any one else. Then it dawned on me. No one has any intrest in what I have to say in real life so why should it be diffrent in a blog?

The way I see it is I really enjoy my new Hobby of collecting, growing and training trees and I can't see any reason why I will ever give it up so if I start this blog and continue to contribute to it for the subsequent years I will have a great diary to look back on and review the mistakes I have made over the years and also what has worked well. It will also be a great way of seeing the progress made by the trees I have and watch my tree collection grow in volume and size.

Being relatively new to bonsai I don't really have any answers to the questions newcomers have but I hope this blog will show how I go about doing things and others will be able to see that us newbies are pretty much all the same and we all make mistakes.

For all those who want to know more about me here's a little about me.

My name is Dean and I'm 31 years old. I live in a small town on the Dorset, Hampshire border where I work as a window cleaner. I'm married to my wife of nearly 9 years, Helen and have the most beautiful little girl in all the world. I've not always cleaned windows and until 2001 served with the 2nd Battalion the Royal Green Jackets for which I'm very proud and feel very privileged. I've a few other hobbies including Golf and weight training but if I'm honest the latter has taken a back seat lately due to lack of time. I'm an England Rugby fan and not in to football in the slightest! I have a go at building websites and think I'm quite good but have my limitations. Without going in to too many personal details that's pretty much me in a nut shell.

I'm going to set the comments to authorization required because I don't want the hauls of spammers that I have had on my other projects ruining the blog. So if you have a genuine comment please do and as long as its not spam I promise to ok it even if its a drastic criticism of me and the blog. After all I want to learn as much as I can and hope others will be able to do the same merely by reading through this beginners bonsai blog.

Dean